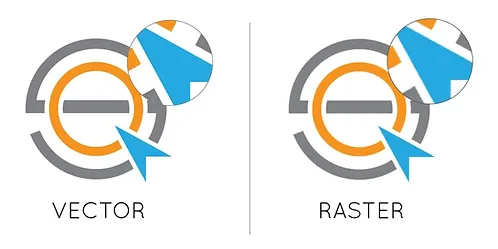
These 3 file formats listed here are vector files. Your artwork must be created in a vector editing software (Adobe Illustrator, Corel Draw) and saved in one of the above vector formats.
There are other types of files that technically can be used, like .jpg files but they don’t garner the best results; .jpg files contain a lot of pixilation and artifacts and it can be very difficult to color separate. This can lead to lost crispness and definition in your design, translating to a fuzzy/jagged print.
If you don’t have one of these files listed before you get started with your order, please contact us so we can help lead you in the direction to ensuring that you get print ready art files. Print ready files will make sure you get the best print possible.
Do I Know If My File Is Print Ready?
These 3 file formats listed here are vector files. Your artwork must be created in a vector editing software (Adobe Illustrator, Corel Draw) and saved in one of the above vector formats.
There are other types of files that technically can be used, like .jpg files but they don’t garner the best results; .jpg files contain a lot of pixilation and artifacts and it can be very difficult to color separate. This can lead to lost crispness and definition in your design, translating to a fuzzy/jagged print.
If you don’t have one of these files listed before you get started with your order, please contact us so we can help lead you in the direction to ensuring that you get print ready art files. Print ready files will make sure you get the best print possible.
So if not vector, why does it need to be 300 DPI or higher?
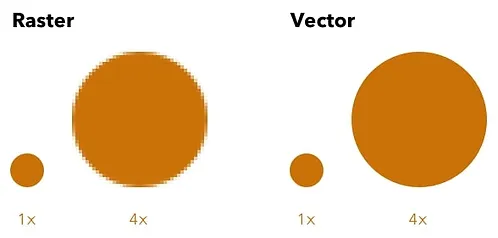
Raster images (.psd, .png, .jpg, .tiff, etc.) are made using a fixed number of colored pixels, so they can’t be dramatically changed in size without compromising their quality. When you adjust the design to fit a space they weren’t designed to fill, their pixels become visibly grainy and the image distorts, creating a muddy or blurry looking print.
To correctly print an image on either a garment or a screen printed poster, it should be at least 300dpi (but 600 DPI is better), a much higher pixel density than the web will display. Resizing a low resolution image (something that’s 72 – 150 DPI) pulled from the web to fit the area you want to print won’t work because the same finite number of pixels only get bigger and begin to distort, you’re not adding more pixels, the ones you had before just expand. To explain, let’s say you want to print your logo at 3″ x 3″ on a left chest. If have a 72 DPI .jpg of your logo and it’s 3-inches by 3-inches, it would need to be “stretched” to more than 3 times its size to get it up to 300 DPI. That 72 DPI logo likely looks great on your computer screen, but when it prints on your product at 300dpi it will look pixelated.
Sized To Print
Sized to print is one of the biggest and most overlooked aspects of file prep. Every file you provide for printing needs to be sized to the specifics you’d like us to print. Stretching a raster file to a size larger than it was originally created at will cause severe distortion.
You can see in the close ups of the enlarged file how much blurrier and fuzzier the edges of the colors are. This will result in muddy prints that just look bad. Make sure that if you’re providing files that they are designed at the size you want them to be printed at. Unless it’s a vector format file, we cannot stretch a 3 x 3 file to be a 12.
Outlines And Rasterization
Outlines and Rasterization are terms that you will hear from us when sending files to print if you’re using vector files like .AI, .EPS, .PDF, or .SVG. If we don’t have a font you used in your design and the vector file is not saved in outlines, then when we open the file the text won’t have the same look as it does on your screen. Saving something with “outlines” means you are locking the text so that it’s no longer a font but instead an accumulation of vector shapes that form your letters. This is important when sending graphics to print to make sure that you get exactly what you’re wanting in your final product. Saving a file in outlines makes your text no longer editable so we recommend that you keep an AI file as an editable master and then save another file as the locked final artwork which you’ll send to print to us.
In a raster file, you can rasterize the text too, which will turn it into pixels instead of a font. If you don’t know how to do these things in Illustrator or Photoshop follow the steps below.
Highlight your text, then select:
Type > Create Outlines
Highlight your text layer, then select:
Layer > Rasterize > Type
WHY IS VMF SPORTSWEAR IS BETTER THAN OTHERS
100% Custom Products
Our products are completely customizable. For e.g, rather than using standard pant shells, we design them to match your jersey.
Exclusive Designs
Unlike others, our unique designs are visually stunning because we create them from ground-up, paying attention to every detail. so that you look great.
More Size Options
We offer a greater variety of sizes (from XS to XXXL) compared to any other manufacturer. In fact, we can create your items in any size you want.
Flat Pricing
Our price per product always remains the same, regardless of the quantity purchased from us. This ensures that you can easily order the right quantity.